'63 11 window

Post pics and info of your rides here split windows only

Moderators: warb, Rawdyn, Leroy, byronbus, Tonz Magonz, dmb

Post Reply
User avatar
MID WEST DUBBER
DSKer
Posts: 1264
Joined: Fri Jan 06, 2012 4:49 pm
Location: Near Horsham, VIC

Re: '63 11 window

Post by MID WEST DUBBER »

Time for an update about the Rotisserie I have been building at school...

With the hoop frames made I then started work on the front and rear mounting locations and got the supports welded into place...

Front...
Image

Rear...
Image

I tack welded equal lengths of RHS between the mounting plates to keep them square and straight when welding them to the rotisserie frame. The rear plates are offset and not central to the hoop as I wanted to have more clearance around the rear wheel arch...
Image
Image
User avatar
MID WEST DUBBER
DSKer
Posts: 1264
Joined: Fri Jan 06, 2012 4:49 pm
Location: Near Horsham, VIC

Re: '63 11 window

Post by MID WEST DUBBER »

To make for easy installment and transport I chose to join the hoops with a sleeve style method with plug welds on one side and a bolt through the other side of the join...
Image

All of the welds/joins/mounting plates etc were cleaned back and painted with a colour matched blue to the existing RHS...
Image

I separated the rear hoop into a top and bottom half with the sleeve joins to make the installation easy. I have circled the joins...
Image

The front hoop was joined in 4 locations which will make it possible to disassemble part of the front hoop while attached to the car, to remove the front doors for dogleg repairs etc...
Image

The main part of the Rotisserie is completed however later on down the track I will add RHS supports which join the two hoops together and also supports to rest underneath the chassis in the centre. Very happy with the outcome of my school project.
User avatar
63 left hooker
DSKer
Posts: 1215
Joined: Tue Nov 24, 2009 1:03 pm
Location: Northern Beaches Sydney

Re: '63 11 window

Post by 63 left hooker »

Great work Rusty, nothing like my school days :shock:
61 dc
67 beetle
User avatar
MID WEST DUBBER
DSKer
Posts: 1264
Joined: Fri Jan 06, 2012 4:49 pm
Location: Near Horsham, VIC

Re: '63 11 window

Post by MID WEST DUBBER »

Front door hinge pin repair - Part 1

I attempted to remove the left hand side front door pin using one of these Bob Drake hinge pin tools. Unfortunately I had no success and the shortest push rod from the tool snapped clean off and didn’t budge the pin.
Image

The driver’s side (RHS) mirror stalk had been snapped off years ago so I decided to try the method of drilling the door pin out and then reaming to suit the oversize mirror stalks or hinge pin.
Image

To make the drilling process easier I decided to remove the hinge from the door. The first step to remove the hinge was to drill out the factory rivets until the heads broke free and the rivet could be removed. I started off with a small hole and went up in size until the rivet head broke loose.
Image
Image
Image
User avatar
MID WEST DUBBER
DSKer
Posts: 1264
Joined: Fri Jan 06, 2012 4:49 pm
Location: Near Horsham, VIC

Re: '63 11 window

Post by MID WEST DUBBER »

Front door hinge pin repair - Part 2

Pic of the rivets removed from the door…
Image

The next step was to mark out and cut two sections which would allow the hinge to be removed from the door. I used a small cut-off wheel in a Dremel to make the cuts. The sheet metal was then carefully peeled back and the hinge removed…
Image
Image
Image
User avatar
MID WEST DUBBER
DSKer
Posts: 1264
Joined: Fri Jan 06, 2012 4:49 pm
Location: Near Horsham, VIC

Re: '63 11 window

Post by MID WEST DUBBER »

Front door hinge pin repair – Part 3

I ground the top and bottom of the existing pin almost flush with the hinge surface then centre punched both ends so the drill bit would locate.
Image

I then drilled out the pin, size by size until there was just a small layer of the pin remaining inside the shaft.
Image

This pic shows the thin layer remaining inside the shaft…
Image

This step is where the dremel came in handy again. This time with a small tip grinding tool.
Image

I used this little grinding tool to carefully grind out a small section of the remaining layer of the pin. This released the pressure from the pin and broke the rusted seal.
Image

I could then use a small flat punch to drive out the remainder of the pin and leave the shaft inside the hinge untouched and undamaged.
Image
User avatar
MID WEST DUBBER
DSKer
Posts: 1264
Joined: Fri Jan 06, 2012 4:49 pm
Location: Near Horsham, VIC

Re: '63 11 window

Post by MID WEST DUBBER »

Front door hinge pin repair – Part 4

A 5/16 drill bit was used to open the hole in both parts of the hinge…
Image

The 5/16 drill bit allowed the .3220” reamer (Purchased from Wolfsburg West) to accurately remove the remaining material and create a hole which would be spot on for the new oversize hinge pins/ mirror stalks.
Image

Using the reamer in the drill press at a low speed…
Image

The new pin fitted through both parts of the hinge and was firm and moving freely. I used counter-sunk bolts and nyloc nuts to re-attach the hinge to the door. The hinge will soon be removed so I can sand blast and paint the cavity behind the hinge. The hinge can then be re-installed and the cuts I made can be welded and ground back.
Image
User avatar
63 left hooker
DSKer
Posts: 1215
Joined: Tue Nov 24, 2009 1:03 pm
Location: Northern Beaches Sydney

Re: '63 11 window

Post by 63 left hooker »

Great work there Rusty, all that schooling wasn't wasted was it?
61 dc
67 beetle
User avatar
KombiMadness
DSKer
Posts: 783
Joined: Fri Aug 12, 2011 8:13 pm
Location: Sunshine Coast

Re: '63 11 window

Post by KombiMadness »

Wow, great work! I really enjoyed that pictorial description of both the rotisserie hoop fab and removing the rusted hinge pin.
Yes, a bit different to my school woodwork/metalwork days..... The coolest thing we did was make skateboard decks.
Post up some more pictorials of your work, Rusty. 8)
My Dad's Kombi circa 1967 at Taronga Zoo. I'm the light weight with the skinny legs, my older brother is doing the roof jump!
User avatar
rabidkombi
DSKer
Posts: 643
Joined: Sun Mar 27, 2011 8:48 am
Location: Hills District,Sydney

Re: '63 11 window

Post by rabidkombi »

Awesome work ,Rusty
Thank you for posting up the pictures :)
User avatar
splitbus
DSKer
Posts: 3232
Joined: Sun Dec 09, 2007 7:47 am
Location: Brisbane Northside

Re: '63 11 window

Post by splitbus »

Nice work, shame you couldn't just get the tool
Attachments
image.jpg
Mike |o\*/o| 55 11 Window

I don't have a bucket list I have a fu#kit list a mile long
User avatar
MID WEST DUBBER
DSKer
Posts: 1264
Joined: Fri Jan 06, 2012 4:49 pm
Location: Near Horsham, VIC

Re: '63 11 window

Post by MID WEST DUBBER »

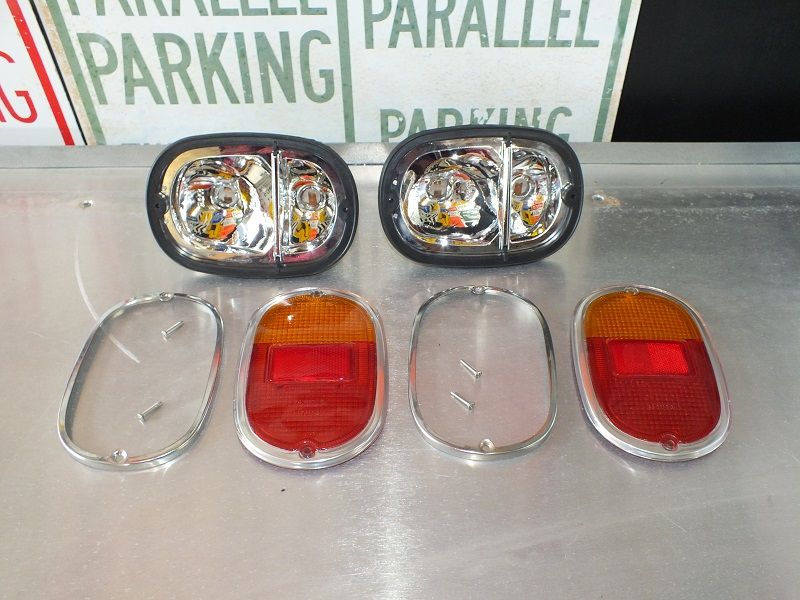
Spent a little bit of time messing around with the tail lights for the bus today.

I've always been a fan of tail lights with a chrome bezel but I couldn't seem to find any apart from the all red US spec ones. I wasn't really all that keen on running the stock Red and Amber lenses with the painted silver style bezel built into the plastic.

So, I decided I would just fit the chrome bezel over the lenses.... But when I had all of the parts, I realised it wasn't going to be that simple.

Image

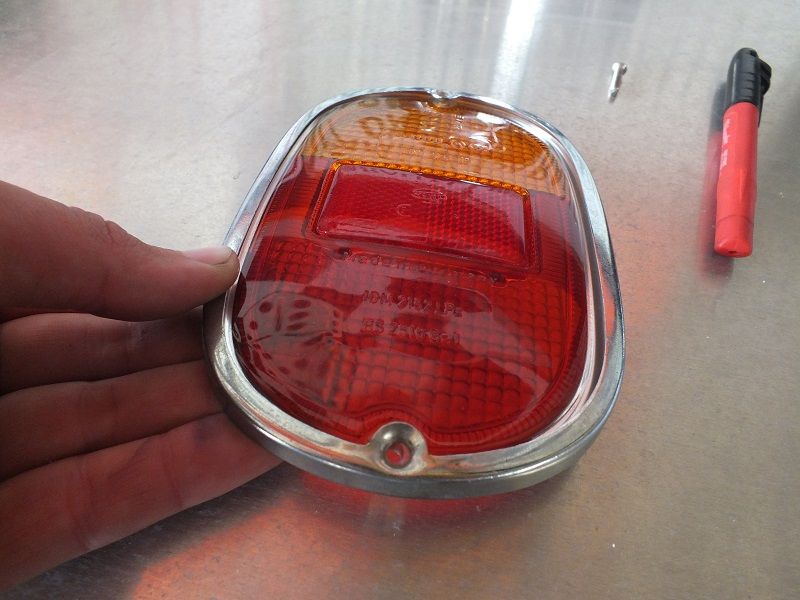
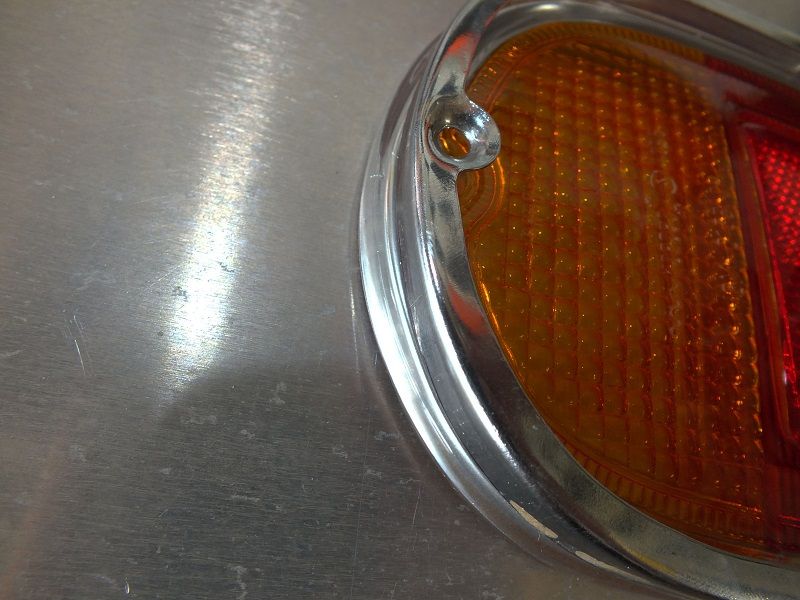
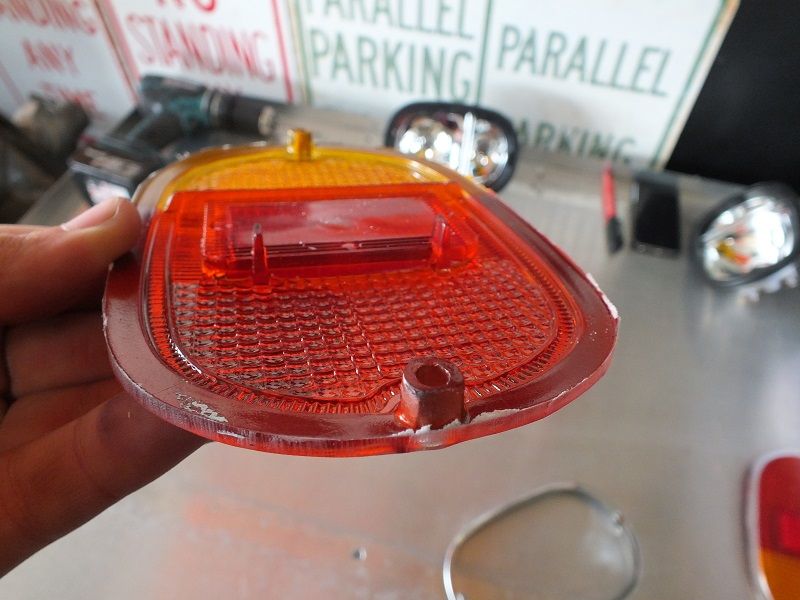
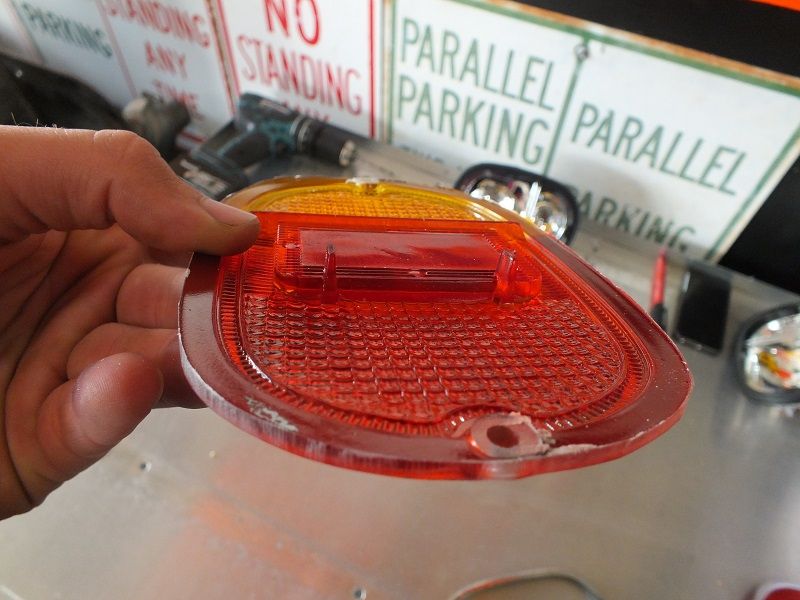
As you can see from this pic, the Hella lense is too large for the chrome bezel...

Image

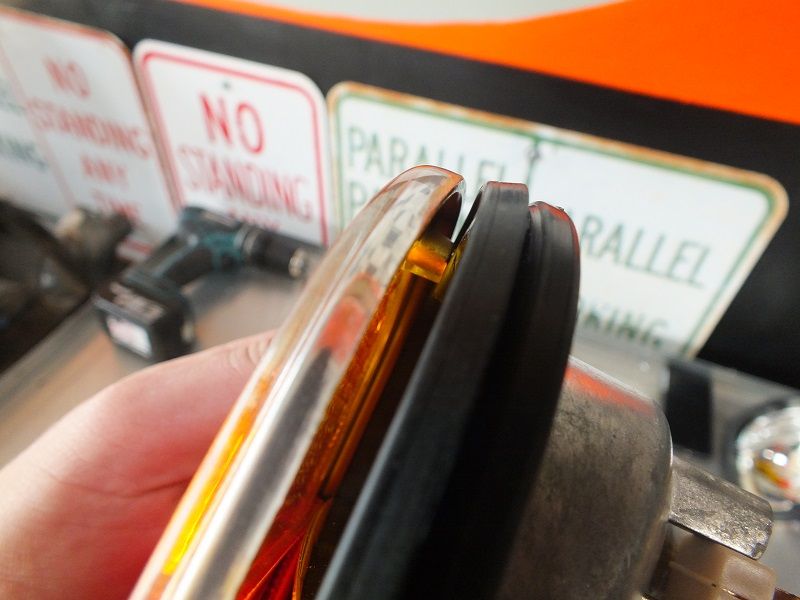
and the screw hole sticks out the back of the lense too far, not allowing it to sit flush...

Image

I started by using the bezel as a guide and marking out how much plastic I needed to remove from the outside edge to ensure the bezel will fit over...

Image

Having ground off the excess from the edges it was now time to remove the bulk of the screw hole so the lense would sit flush at the base...

Image
Image

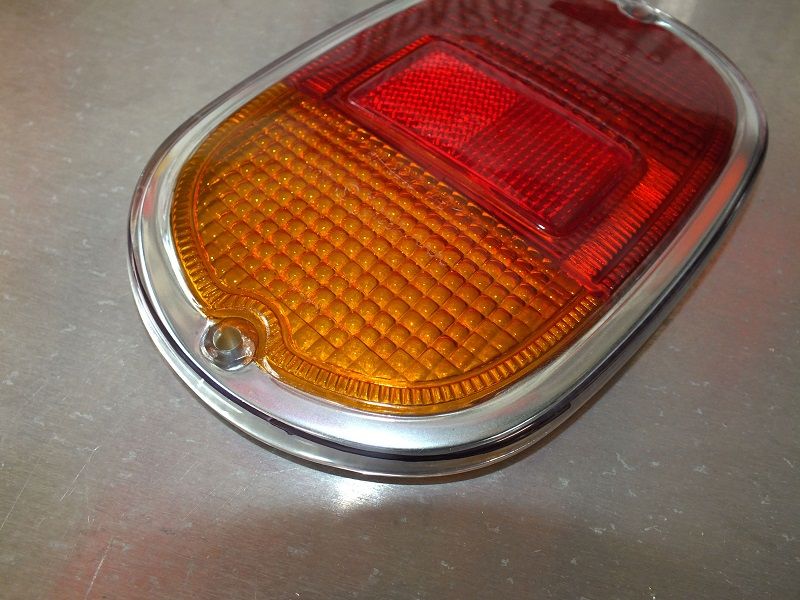
The bezel now fits around the outside...

Image
User avatar
MID WEST DUBBER
DSKer
Posts: 1264
Joined: Fri Jan 06, 2012 4:49 pm
Location: Near Horsham, VIC

Re: '63 11 window

Post by MID WEST DUBBER »

The next step was to counter sink the screw holes on the lense due to the counter sink on the bezel...

Image
Image

Because I had to grind so much off the edges of the lenses, I now had to space the lense back out to tack up the slack from the removed plastic. So I made up a spacer from a piece of alloy...

Image
Image
Image

All screw together and satisfied with the result. Much nicer then the silver paint on the inside of the plastic. Plan on getting the second one finished off this coming weekend...

Image
Image
User avatar
rabidkombi
DSKer
Posts: 643
Joined: Sun Mar 27, 2011 8:48 am
Location: Hills District,Sydney

Re: '63 11 window

Post by rabidkombi »

Awesome work :)
User avatar
57Bus
DSKer
Posts: 269
Joined: Sat Jul 30, 2011 10:48 pm
Location: Sunshine Coast

Re: '63 11 window

Post by 57Bus »

I was busy scratching my arse and chasing girls when I was at school, great work, keep it up!
1958 11 window under resto.
Post Reply