OK the Photos from this weekend
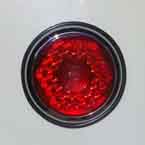
How to restore your split and cracked original steering wheel for $25.50.
Tools:
Bastard File $10
Sand paper $2
Material:
Epoxy putty $10
Black enamel rattle can $3.50
1. File out all the cracks opening them up as much as possible.
2. Need the putty in small amounts.
3. Work deep into each opening repeat until all openings are filled..
4. Allow to set.
5. Roughly file into shape.
6. Fine sand.
7. Paint.
Done.
... And so it begins.
Moderators: warb, Rawdyn, Leroy, byronbus, Tonz Magonz, dmb
-
Fathermarc
- DSKer
- Posts: 285
- Joined: Thu Mar 21, 2013 6:25 pm
Re: ... And so it begins.
- Attachments
-
- All filed out
-
- Filed out all the cracks.
-
- Top filled
-
- This side filled
-
- Centre filled
-
- Filled these splits
-
- Filled the cracks on the rim.
-
- Wolfsburg horn in...
-
- All filled and painted
-
- Steering wheel done...
---------
58 Kombi
69 Soft top beetle
65 Izh Jupiter with side car
2006 Ducati 999 Xerox
58 Kombi
69 Soft top beetle
65 Izh Jupiter with side car
2006 Ducati 999 Xerox
-
63 left hooker
- DSKer
- Posts: 1215
- Joined: Tue Nov 24, 2009 1:03 pm
- Location: Northern Beaches Sydney
Re: ... And so it begins.
So that's what kitchen benches are designed for 
Nice work though
Nice work though
61 dc
67 beetle
67 beetle
-
Fathermarc
- DSKer
- Posts: 285
- Joined: Thu Mar 21, 2013 6:25 pm
Re: ... And so it begins.
So here's the story so far.
- Attachments
-
- Nice to get the semaphores working. I have a new set ready to go in if these babies are gone. The new ones are 12V
-
- Just thought I'd try the original pop outs. Looks like a car again.
-
- This was the worst of the damage until a few weeks back. I'm happy with the progress so far.
-
- Banging out the back end was worth the time and effort.
-
- If only we could make valla... There's always next year. BOOOO HOOOO!
-
- The Kombi is begging for a lowering... Next week... HMMMMMMMMM
-
- The panel beating is coming.... Slowly.
-
- I'm beginning to appreciate the restoration of the old.
-
- Headlamp bucket was rusted out. So here's some fresh metal and a new life to the old bucket.
-
- I'm tapping the metal into a seamless joint. Painstakingly slow but I like to see the results are worth the effort.
---------
58 Kombi
69 Soft top beetle
65 Izh Jupiter with side car
2006 Ducati 999 Xerox
58 Kombi
69 Soft top beetle
65 Izh Jupiter with side car
2006 Ducati 999 Xerox
-
Fathermarc
- DSKer
- Posts: 285
- Joined: Thu Mar 21, 2013 6:25 pm
Re: ... And so it begins.
63 left hooker wrote:So that's what kitchen benches are designed for
Nice work though
Yeah!... That's right I agree with you but guess what the long haired accountant likes to voice an alternative view.
---------
58 Kombi
69 Soft top beetle
65 Izh Jupiter with side car
2006 Ducati 999 Xerox
58 Kombi
69 Soft top beetle
65 Izh Jupiter with side car
2006 Ducati 999 Xerox
-
Cam Biscuit
- DSKer
- Posts: 1516
- Joined: Sun Feb 26, 2012 4:56 pm
- Location: Radelaide
Re: ... And so it begins.
Nice work on the wheel Marc
-
Fathermarc
- DSKer
- Posts: 285
- Joined: Thu Mar 21, 2013 6:25 pm
Re: ... And so it begins.
Cam Arnott wrote:Nice work on the wheel Marc
Thanks Cam... Hows you little build coming along?
---------
58 Kombi
69 Soft top beetle
65 Izh Jupiter with side car
2006 Ducati 999 Xerox
58 Kombi
69 Soft top beetle
65 Izh Jupiter with side car
2006 Ducati 999 Xerox
-
Cam Biscuit
- DSKer
- Posts: 1516
- Joined: Sun Feb 26, 2012 4:56 pm
- Location: Radelaide
Re: ... And so it begins.
Well I'm about to swap ends for a while to break the routine!
-
Fathermarc
- DSKer
- Posts: 285
- Joined: Thu Mar 21, 2013 6:25 pm
Re: ... And so it begins.
I know that feeling... Keep soldering on, every little triumph is a step closer to the end result.Cam Arnott wrote:Well I'm about to swap ends for a while to break the routine!
---------
58 Kombi
69 Soft top beetle
65 Izh Jupiter with side car
2006 Ducati 999 Xerox
58 Kombi
69 Soft top beetle
65 Izh Jupiter with side car
2006 Ducati 999 Xerox
-
Fathermarc
- DSKer
- Posts: 285
- Joined: Thu Mar 21, 2013 6:25 pm
Re: ... And so it begins.
140601-Resto
Today I had a quiet day. I decided to strip the red aftermarket paint from the cockpit. I have wanted to take it back to the original Dove blue since I bought the Kombi last year. I used Mr Muscle oven cleaner. I was a little concerned that because it was Caustic free that it would have little or no effect but actually it worked really well. I did have to leave it on long time well.. OK I sprayed it on last Sunday before covering the kombi up. The paint peeled off in large sheets in most places and had no effect on the OG paint underneath. I took my time and worked all round the ins and outs but worth every minute. After the stripping I fitted the restored steering wheel for the photo shoot and I believe that the Kombi is beginning to take shape.
Images tell a better story...
- Attachments
-
- We are getting there...
-
- Before...
-
- ...After
-
- The back has been sprayed with oven cleaner for next Sundays stripping.
-
- The Cargo side in mid strip.
-
- I think I may use a colour match to fill in the areas that are lacking in blue.
-
- A little elbow grease and time and here you go. A fully stripped out cockpit ready for the seats.
-
- The restored steering wheel insitu. not permanently fitted just yet. I want to paint the steering column first.
-
- The bare metal on the NS is from the new floor that I welded in. The Bare metal o the OS is where the red was painted on bare metal. Both have been given a spraying of rust converter.
---------
58 Kombi
69 Soft top beetle
65 Izh Jupiter with side car
2006 Ducati 999 Xerox
58 Kombi
69 Soft top beetle
65 Izh Jupiter with side car
2006 Ducati 999 Xerox
-
Fathermarc
- DSKer
- Posts: 285
- Joined: Thu Mar 21, 2013 6:25 pm
Re: ... And so it begins.
OK Some more
- Attachments
-
- No... this is not father Christmas's sleigh.
-
- Next week I'm hoping to get the light buckets welded back in. First the nose section will need to be panel beaten into shape.
-
- I have some new bits and bobs for the gear stick. All the steering column components have been finished in Black enamel. I want the Kombi to be faithful to the original with a modern twist of running gear.
-
- From the inside out.
-
- Oh man I can't wait to fit the Safaris and new sprayed wheels.
---------
58 Kombi
69 Soft top beetle
65 Izh Jupiter with side car
2006 Ducati 999 Xerox
58 Kombi
69 Soft top beetle
65 Izh Jupiter with side car
2006 Ducati 999 Xerox
-
067DUB
- DSKer
- Posts: 2884
- Joined: Mon Oct 24, 2011 5:09 pm
Re: ... And so it begins.
Nice man! go hard
-
Fathermarc
- DSKer
- Posts: 285
- Joined: Thu Mar 21, 2013 6:25 pm
Re: ... And so it begins.
Cheers Dub... Been following your build also. You're going great with that bus of yours, it's looking and sounding great.
---------
58 Kombi
69 Soft top beetle
65 Izh Jupiter with side car
2006 Ducati 999 Xerox
58 Kombi
69 Soft top beetle
65 Izh Jupiter with side car
2006 Ducati 999 Xerox
-
63 left hooker
- DSKer
- Posts: 1215
- Joined: Tue Nov 24, 2009 1:03 pm
- Location: Northern Beaches Sydney
-
Fathermarc
- DSKer
- Posts: 285
- Joined: Thu Mar 21, 2013 6:25 pm
Re: ... And so it begins.
140609_Resto
Right it's been a great few days on the Kombi. I just wish I had another week off work. WORK SUCKS!.. Why is there always something that stand in the way of a Kombi project.
I've attache a few photos so you can see what I've been getting up to.
A quick synopsis:
1. Filed and tapped the font into shape.
2. Cleaned up both German Helmets and installed both.
3. Stripped out the controls and enameled them black.
4. Prepared the floor, filled and a quick blow over.
5. Stripped out more of the interior red paint. It's only now that I realize how much red suck (even more than work!)
6. Rust converted the Engine Compartment.
...OK now for a extensive collection of images. ENJOY!
- Attachments
-
- I couldn't help my self. All that can shaking and Whoops it exploded in my hands... Hee hee!
-
- No no-one likes red eye.
-
- This old thing is loosing the red eye.
-
- Hmmmmmmm ... Starting to take shape.
-
- OHHHH! I Like it!
-
- I've filled the German helmets with foaming oven cleaner to remove the last of the red. It looks like someones turned the lights on.
-
- The Back end is looking much better. Will need a tapping into shape at some point.
-
Last edited by Fathermarc on Mon Jun 09, 2014 9:47 pm, edited 1 time in total.
---------
58 Kombi
69 Soft top beetle
65 Izh Jupiter with side car
2006 Ducati 999 Xerox
58 Kombi
69 Soft top beetle
65 Izh Jupiter with side car
2006 Ducati 999 Xerox
-
Fathermarc
- DSKer
- Posts: 285
- Joined: Thu Mar 21, 2013 6:25 pm
Re: ... And so it begins.
Cont....
- Attachments
-
- Why paint it red?
-
- Kombi installation. I see it hanging above my head when I'm sleeping.
-
- Say good bye to this terrible abomination. Why would you do this The paintwork underneath has been perfect through out.
-
- Give me back my eyes you monster.
-
- German helmet ready for primer.
-
- Out damn spot!
-
- OK well there you go! Hours and Hours of tapping, filing ant here you have it. Front as smooth as I can get it without filler.
-
- This looks like a block.
-
- This looks a bit Rock Star.
-
- Internally blue... There needs to be more oven cleaner. I like this Dove blue... I like it a lot!
---------
58 Kombi
69 Soft top beetle
65 Izh Jupiter with side car
2006 Ducati 999 Xerox
58 Kombi
69 Soft top beetle
65 Izh Jupiter with side car
2006 Ducati 999 Xerox