55 SC Ute build

Post pics and info of your rides here split windows only

Moderators: warb, Rawdyn, Leroy, byronbus, Tonz Magonz, dmb

User avatar
Daisy Mae
DSKer
Posts: 40
Joined: Thu Jan 16, 2014 8:55 pm
Location: Brisbane, Narangba.

55 SC Ute build

Post by Daisy Mae »

"h" came over today to grab a light off us and commented on how the ute looks so different to our pictures from our welcome thread. Dannyred came to the same conclusion and suggested we put up a build thread. It isn't as far along as I'd like but some people are eager to see it and like SMV said, it will give us some more motivation.

So here goes!

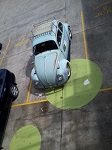
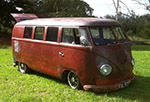
Welcoming home the '55 SC. Looking nice, a few big dings and some funky yellow paint and oh.... some rust. :P

Image
Image

At this point we started to strip it.... and strip it some more... and then I decided that there is just too much rust and too much that I want to fix, so we decided that we weren't going to go for the ratty look. (Which displeased the hubby :P) but we sorted it out, going back to Dove Blue with some nice shiny parts to go with it. None of this funky yellow.


We got it sandblasted by my uncle for the hefty price of a carton of grog :P. Then bits started to fall off. :(
Honestly though some of the panels were a bit worse off then I had thought, but some surprised me completely.
The gutters were fine. Cab floor, not so much. The expected drivers side outer sill was terrible along the bottom. But the engine bay wasn't too shabby.

Image
Image

Ahhhh she's nice and clean.

While I was away hubby decided he would start on the drivers side lower sill.

Image

Then with lots of welding and grinding and some swearing involved we attached the new sill!

Image


Camera is out at the moment so new pics tomorrow with some more updates on what we've done.

By the way it was super awesome meeting you Pauly and Danny. Will definitely need to catch up again sometime. And we can't wait to see your build thread on your new panel Chris. :wink:
User avatar
Ged
DSKer
Posts: 515
Joined: Tue Dec 13, 2011 8:30 pm
Location: Gold Coast

Re: 55 SC Ute build

Post by Ged »

That looks great. Love the one sided flipper jig. Is there only the one cross brace needed?
Ged

57 11window project
64 Standard Beetle
69 Lowlight
70 CB100 x 2
User avatar
Daisy Mae
DSKer
Posts: 40
Joined: Thu Jan 16, 2014 8:55 pm
Location: Brisbane, Narangba.

Re: 55 SC Ute build

Post by Daisy Mae »

Thanks!
Hubby made up the jig, you can pull the side bits out and insert them into the other side to flip it the other way if needed. Made a lot of jobs easier. Also good for how much little room we have in our garage.

Front and back cross braces and all outriggers are needed. :(
User avatar
Daisy Mae
DSKer
Posts: 40
Joined: Thu Jan 16, 2014 8:55 pm
Location: Brisbane, Narangba.

Re: 55 SC Ute build

Post by Daisy Mae »

Ahhhh! Some more pictures!

Here we have the sub floor thingy that SMV had made for his SC but didn't use it so we snatched it up. Saved Jason a lot of work and money!

Image

And here is it sitting in the tray. Fits nicely.
We also got the support pillars for under the tray floor but we need to do a bit of cutting out and patching up before we weld them on. I also started bashing out the vents at the back while Jason welding some plates in to plug up the wholes where they put some gay 80's aftermarket lights in, so now we only have the 2 original holes for the rear lights. Got the drivers side vents to be pretty spiffy jiff but still a little bit more work to be done on those to make them perfect.

Image

Image

Got some goodies! New semaphores, rear lights, floor panels, top support to the treasure door, a treasure chest door, lower front section.


Next on the hubbys to do list was the front. We bashed the front out as much as possible before he cut the bottom half out. With the heater tube being in the way right in the center we ended up getting a car jack handle (the wind up ones you have to manually wind), putting a whole heap of duct tape at the end of it and then pushing bit by bit in circles to pop it out.
(we should have taken some pics of that :( )

Image

All cut out! Time to replace lower A pillars and front valance. And get the sandblaster in there to get rid of that rust.

Image

I told Jason that I could weld better than him, but he didn't believe me. hehe :roll:

Image
Image

Starting to look better already with the front semi done.
Some grinding. You can see my awesome paint job popping out the bottom there. hehe. :lol:

Image

Ah, all primered. That looks better.

Image

Would look so much better with some lights in and some safaris out, but we arn't there just yet.
Hubbys working on the roof which had a plate screwed down covering a big circular hole and the back of the cab.

We had a lot of issues with getting the doors off. As you could imagine. Was fun holding them to put them in 1000 times when we were re-fitting them to the new pillars. :roll:

Oh well, you get that :P
User avatar
resinmonkey
DSKer
Posts: 947
Joined: Tue Jul 08, 2008 8:30 am
Location: Margs

Re: 55 SC Ute build

Post by resinmonkey »

looking the business-well done! some great progress already 8)
User avatar
Ian 68
DSKer
Posts: 1373
Joined: Sat May 02, 2009 9:58 pm
Location: Caloundra, QLD

Re: 55 SC Ute build

Post by Ian 68 »

Excellent work, look forward to seeing this one progress.
Proudly sponsored by Cunado wear.
User avatar
067DUB
DSKer
Posts: 2884
Joined: Mon Oct 24, 2011 5:09 pm

Re: 55 SC Ute build

Post by 067DUB »

Brilliant stuff, lovely welding :D
User avatar
scotty*85vw
DSKer
Posts: 1277
Joined: Thu Sep 09, 2010 9:34 pm

Re: 55 SC Ute build

Post by scotty*85vw »

welding porn at it finest!

nice to see her getting some top notch loving. I almost bought this until the one I have now popped up the same weekend.

Cant remember but I hope it came with the seats when you got it. best part from memory
User avatar
h
DSKer
Posts: 814
Joined: Sun May 22, 2005 1:26 pm
Location: Tee Tree Noosa
Contact:

Re: 55 SC Ute build

Post by h »

nice to meet you both and great to see some updated pics here
cheers pauly
Barrels available SE Qld - http://www.barrelman.com.au

Slashing & Excavating - http://noosaslashing.com.au

Fantasy - http://seventhchronicle.com
User avatar
Daisy Mae
DSKer
Posts: 40
Joined: Thu Jan 16, 2014 8:55 pm
Location: Brisbane, Narangba.

Re: 55 SC Ute build

Post by Daisy Mae »

Yes, it was lovely to meet you too Pauly!

Someone must have snatched the seats up before we bought the ute. :( But thats alright, we will make do.

Thanks for the comments everyone. :D
User avatar
matara
Admin
Posts: 1472
Joined: Wed May 18, 2005 11:34 pm
Location: Wahroonga, Sydney
Contact:

Re: 55 SC Ute build

Post by matara »

Nice to see another 55 ute coming back to life. I have an ex-NZ 55 ute that I am working on at the moment welding in a new floor below the fuel tank:-

What is your chassis number? Mine is a late April 55, making it about 5-6 weeks off being a barndoor.

Let me know if you need any reference pics or measurements. There are a lot of differences on a Wolfsburg 55 ute versus later utes.

Cheers

Steve

Image
User avatar
Daisy Mae
DSKer
Posts: 40
Joined: Thu Jan 16, 2014 8:55 pm
Location: Brisbane, Narangba.

Re: 55 SC Ute build

Post by Daisy Mae »

Hey Steve! The chassis number is 20 - 119066 , March 55.

And I might take you up on that offer of reference pics someday soon. Jason said something to me earlier about needed to know what measurement something was, but it has totally slipped my mind atm. Just keep an eye out for a pm from me. Hehe.
User avatar
Daisy Mae
DSKer
Posts: 40
Joined: Thu Jan 16, 2014 8:55 pm
Location: Brisbane, Narangba.

Re: 55 SC Ute build

Post by Daisy Mae »

Been awhile, haven't accomplished much lately but i've got alot of new parts in so prepare to new pics ! :D :D

Meanwhile installed outriggers and inner sill, put the jacking point on and it seems extremely low from the outside, it was up nice and tight on the out rigger though, is it something i've done or is it the actual jacking point? Thanks

Image

Image
User avatar
FrankenCab
DSKer
Posts: 3528
Joined: Wed Apr 18, 2007 8:55 pm

Re: 55 SC Ute build

Post by FrankenCab »

should have fitted the outer sill last so you could have pre assembled , jacking points , outriggers and innersills first with self tappers ..but they look fine as the autocraft ones hang down a little .
Straight axle is better than IRS
User avatar
Daisy Mae
DSKer
Posts: 40
Joined: Thu Jan 16, 2014 8:55 pm
Location: Brisbane, Narangba.

Re: 55 SC Ute build

Post by Daisy Mae »

Thanks FrankenCab, yeah that's what i've done it's just held there at the moment with self tappers to see how it all matched up. So none the less they do hang low but it's fine? :)
Post Reply