So, unfortunately my 11 window bus caught on fire; note to self, don;t put off tomorrow what you can do today. People; buy a fire suppression system!
Anyway, AL from Das Resto Haus has taken on the job and is doing an amazing job at that. As Al was putting his name to it, we had to take it back to bare metal and start again as whilst we thought we knew the car, you can never guarantee anything in life. Unfortunately, even though I was under the impression the bus was restored with great attention to detail previously, this is far from the case as you will see. For more information on this, please refer to my post under anything goes for a bit of a backgrounder. Anyway, some pics thanks to Al. A quick shout out to Das Resto Haus; they only know one way of restoring cars, and that is correctly. Pleased they have taken on the job and accommodating my requests; very talented team and great people to deal with.
sorry, a few of the pics aren't in order, but you'll get the idea
Anyway some pics;
or you can follow the resto thread from Al at http://dasrestohaus.com.au/gallery2/v/C ... 11+Window/
My 60 11 Window Bus
Moderators: warb, Rawdyn, Leroy, byronbus, Tonz Magonz, dmb
-
New dude
- DSKer
- Posts: 194
- Joined: Tue Feb 19, 2008 9:14 pm
My 60 11 Window Bus
- Attachments
-
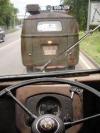
- following a fire, she arrives at Das Resto Haus; dusty and feeling sorry for himself
-
- still looks good.......
-
-
-
- Ouch. Get a fire suppression system!
-
-
-
-
-
Last edited by New dude on Mon Mar 06, 2017 6:30 pm, edited 6 times in total.
-
New dude
- DSKer
- Posts: 194
- Joined: Tue Feb 19, 2008 9:14 pm
Re: My 60 11 Window Bus
Some more pics
- Attachments
-
- Lower b-pillar was replaced previously but cargo door screw holes were just a big hacked oval rather than the dimpled individual holes
-
- short side was too rough to be repaired properly, easier to replace with a new panel
-
- Bulkhead was haggered, but will have to be repaired as new ones aren't available and finding good originals is almost impossible nowadays
-
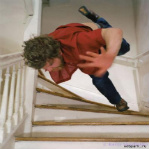
- Oh s*&t. Not what anyone expected
-
- Off to blasters - hopefully nothing nasty....
-
- Ahh, shouldn't this be attached?
-
- New nose is the only way to repair it properly
-
- was full of bog, so had to be done properly
-
-
Last edited by New dude on Mon Mar 06, 2017 3:42 pm, edited 3 times in total.
-
New dude
- DSKer
- Posts: 194
- Joined: Tue Feb 19, 2008 9:14 pm
Re: My 60 11 Window Bus
and more
- Attachments
-
-
-
- not sure what to say about this really
-
-
- past repairs...
-
- ahhh, okay then
-
- I felt a little sick seeing this one
-
-
- so much better
-
- All edges painted with weld through primer for corrosion protection (has to be bare metalled for adequate weld penetration first)
Last edited by New dude on Mon Mar 06, 2017 3:45 pm, edited 2 times in total.
-
New dude
- DSKer
- Posts: 194
- Joined: Tue Feb 19, 2008 9:14 pm
Re: My 60 11 Window Bus
some more
- Attachments
-
-
- As the doglegs had been replaced previously and nothing lined up particularly well, the new Klassic Fab b-pillar section had to be cut and shut to line up with the dogleg and cargo door aperture
-
- Lower nose support strip across the valance had to be cut off and repositioned to allow correct positioning of the nose
-
- A-pillar (windscreen) join welded and dressed
-
- centre pillar same....
-
- Right side done too.
-
- Nose folded around a-pillars and welded
-
- New Klassic Fab cargo door sill being prepared for installation
-
- C-pillar had to be porta powered out quite a bit to correct alignment first
-
- The new quarter panel was a few mm too long so it has to be tweaked to fit between the c-pillar and rear corner. Also you can't get a spot welder into the top edge above the vents so this area is cut out and butt welded to the original panel
Last edited by New dude on Mon Mar 06, 2017 3:47 pm, edited 1 time in total.
-
New dude
- DSKer
- Posts: 194
- Joined: Tue Feb 19, 2008 9:14 pm
Re: My 60 11 Window Bus
still more
- Attachments
-
- You can see the rear fold has been straightened out and will be refolded and reshaped to match the curvature of the corner once the rest of the panel fits correctly
-
- The alignment of the new sill is obviously far better than before
-
- ph look, it lines up
-
-
-
- Like a lot of other parts of the bus, the engine lid was pretty average with poor fit, poor gaps and poor alignment, plus a few poor repairs thrown in for good measure
-
- Fortunately the rear hatch was not too bad
-
- The engine lid hinges are supposed to be screwed to the lid, obviously the captive nut plates were too hard to repair so the hinges were just welded to the lid
-
- Buy the time we would have spent several hours unpicking the hinges, re fabricating the captive nut plates and surrounding metal and repairing the rest of the lid, it was more cost effective to replace it with a new lid
-
- DAS Resto Parts supplied the new lid and hinges and funnily enough it fits well! Just a bit of tweaking to the quarter panels to come (where they grafted in new tail light sections in the previous resto, but otherwise much more acceptable
Last edited by New dude on Mon Mar 06, 2017 3:49 pm, edited 1 time in total.
-
New dude
- DSKer
- Posts: 194
- Joined: Tue Feb 19, 2008 9:14 pm
Re: My 60 11 Window Bus
another lot
- Attachments
-
-
-
- I really felt sick when I saw this; according to Al "Long side was lumpy to put it nicely"
-
- So it too had to come off to make way for a new panel
-
- Oops, most of forgotten this last time...
-
- ahh, that's better, it's attached
-
- Few other problems with the pillars could be rectified at the same time with the long side removed
-
- The right side b pills was previously replaced but alignment was a....little...out :0
-
- The right side dog leg was replaced back in the day before quality repro panels were available - but rather than replacing the whole thing again, a few problem areas could be rectified like the rear edge fold which was rounded over
-
- The section was cut out, the inner b pillar repaired
Last edited by New dude on Mon Mar 06, 2017 4:04 pm, edited 3 times in total.
-
New dude
- DSKer
- Posts: 194
- Joined: Tue Feb 19, 2008 9:14 pm
Re: My 60 11 Window Bus
and some more
- Attachments
-
- Then a new section was welded in
-
- The rear corner repairs weren't overly straight as evidenced by the tight gap to the engine lid down the bottom compared to the top, so some more surgery was required here
-
- The corner was cut and shut to rectify the gaps
-
- Fully welded and dressed....gaps back to where they should be
-
Leroy
- DSKer
- Posts: 2544
- Joined: Thu Jul 05, 2007 11:58 pm
- Location: Brisbane (bayside)
Re: My 60 11 Window Bus
Sorry to hear about the fire, and then to see the pics of what lurked beneath  Al and the boys helped me out back in the day with my Panel van when another "resto" shop went bust.
She is in good hands now. Look forward to following its progress.
She is in good hands now. Look forward to following its progress.
2018 Year of the Barndoor
-
spl65t
- DSKer
- Posts: 1673
- Joined: Wed May 27, 2009 8:18 pm
- Location: Hills Area - Sydney
Re: My 60 11 Window Bus
Holy Moly.....
Looks like this bus...surely not
viewtopic.php?f=2&t=10071&p=95421&hilit ... sto#p95421
Looks like this bus...surely not
viewtopic.php?f=2&t=10071&p=95421&hilit ... sto#p95421
Der Splitty.....slowest thing up the Blue Mtns, since Wentworth, Blaxland & Lawson 
-
Shaven

- DSKer
- Posts: 7420
- Joined: Tue Sep 19, 2006 4:17 pm
Re: My 60 11 Window Bus
WOW ... just WOW 
Good to see it getting the treatment to bud deserves... Jas hope it all works out for you mate
Good to see it getting the treatment to bud deserves... Jas hope it all works out for you mate
Only those whom drive a Dual Cab, Know what real driving is all about
-
tatvw

- DSKer
- Posts: 328
- Joined: Sun Aug 03, 2008 4:29 pm
- Location: Smiths lake
- Contact: