I’m thinking dog, kids and wife in the back. The esky can ride in the cab with me.
Yep glad I did the rear safari, tend to use it every trip and definitely need it with the fronts opened up.
Another plus is the bugs just go straight through.
62 Split Ute
Moderators: warb, Rawdyn, Leroy, byronbus, Tonz Magonz, dmb
-
Beatts

- DSKer
- Posts: 371
- Joined: Wed May 30, 2018 11:23 pm
- Location: Adelaide
-
Beatts
- DSKer
- Posts: 371
- Joined: Wed May 30, 2018 11:23 pm
- Location: Adelaide
Re: 62 Split Ute
Steering box raise was next on the agenda
Long side panel was finished off and fitted after the treasure chest was painted along with the engine bay and underneath of the ute
Next step required transportation to the Wizards magic cave!
-
Beatts
- DSKer
- Posts: 371
- Joined: Wed May 30, 2018 11:23 pm
- Location: Adelaide
Re: 62 Split Ute
Loaded and ready to head South where Ian put the Ute back onto some rubber. Flipped spindles on the front and straight axle conversion for the rear.
Can’t express enough how helpful Ian was in simplifying what was needed to get the stance right and brakes sorted.
The steering box was in good nick, so after stripping, cleaning and packing with grease it was ready to get painted up along with everything else. Felt good to actually get stuck into something myself.
Can’t express enough how helpful Ian was in simplifying what was needed to get the stance right and brakes sorted.
-
MID WEST DUBBER

- DSKer
- Posts: 1264
- Joined: Fri Jan 06, 2012 4:49 pm
- Location: Near Horsham, VIC
Re: 62 Split Ute
Very cool Beatts 
-
Beatts
- DSKer
- Posts: 371
- Joined: Wed May 30, 2018 11:23 pm
- Location: Adelaide
Re: 62 Split Ute
Thanks Rusty. I’ve followed your notchback thread and they both look great, especially the 68!MID WEST DUBBER wrote:Very cool Beatts
-
morts
- DSKer
- Posts: 2092
- Joined: Sun Oct 29, 2006 9:22 pm
- Location: McLaren Vale, South Australia
Re: 62 Split Ute
Indeed, I'm a sucker for a good ute and being local looking forward to seeing it about.MID WEST DUBBER wrote:Very cool Beatts
No matter what happens they can't take you out in the street and shoot you......
-
Beatts
- DSKer
- Posts: 371
- Joined: Wed May 30, 2018 11:23 pm
- Location: Adelaide
Re: 62 Split Ute
Thanks Morts. It gets out often so there’s a good chance you willmorts wrote:Indeed, I'm a sucker for a good ute and being local looking forward to seeing it about.MID WEST DUBBER wrote:Very cool Beatts
-
Beatts
- DSKer
- Posts: 371
- Joined: Wed May 30, 2018 11:23 pm
- Location: Adelaide
Re: 62 Split Ute
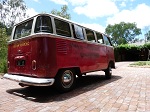
Colour applied with all prep and paint done by Martin. Came up well using acrylic in pearl white.
Thought if it was painted using two pack it would be way too shiny for a commercial split Ute and want to see how the acrylic ages over time. Might even be tempted to help it along.
Bumpers done in L345 light grey along with the hub caps.
Thought if it was painted using two pack it would be way too shiny for a commercial split Ute and want to see how the acrylic ages over time. Might even be tempted to help it along.
- 9225FB03-1E72-4732-A22F-B8D318232A62.jpeg (13.72 KiB) Viewed 6152 times
- 0C31E8D6-2F50-43F4-91E6-CAE275B1D0F7.jpeg (11.08 KiB) Viewed 6152 times
- C05F1C8D-65BC-4F8B-84AD-20226EC12913.jpeg (12.14 KiB) Viewed 6152 times
-
067DUB

- DSKer
- Posts: 2883
- Joined: Mon Oct 24, 2011 5:09 pm
Re: 62 Split Ute
Looks excellent, well done
-
Griffin

- DSKer
- Posts: 822
- Joined: Sun Nov 19, 2006 3:32 pm
- Location: Freo
- Contact:
Re: 62 Split Ute
looking good, great progress!
Gordon
http://www.allaircooled.com.au
63 SC my daily driver
62 11 window
60 23
59 SC (project)
68 Country Buggy KO329
56 shorty kombi-sold now a Retro RV
68 Country Buggy KO418 (sold)
67 PMG sold - sold
61 Karmann Ghia - (the wifes) sold
http://www.allaircooled.com.au
63 SC my daily driver
62 11 window
60 23
59 SC (project)
68 Country Buggy KO329
56 shorty kombi-sold now a Retro RV
68 Country Buggy KO418 (sold)
67 PMG sold - sold
61 Karmann Ghia - (the wifes) sold
-
morts
- DSKer
- Posts: 2092
- Joined: Sun Oct 29, 2006 9:22 pm
- Location: McLaren Vale, South Australia
Re: 62 Split Ute
That's perfect
No matter what happens they can't take you out in the street and shoot you......
-
Cam Biscuit
- DSKer
- Posts: 1516
- Joined: Sun Feb 26, 2012 4:56 pm
- Location: Radelaide
Re: 62 Split Ute
This thing is gorgeous in person, well done Mark & Cooper
Makes me want another splitty!
Makes me want another splitty!
-
Beatts
- DSKer
- Posts: 371
- Joined: Wed May 30, 2018 11:23 pm
- Location: Adelaide
Re: 62 Split Ute
Thanks gents and yes couldn’t have got this done without Cooper, Ian, Martin and Shane from Cartek. Not just there expertise but wealth of information to help me make right decisions.
-
Beatts
- DSKer
- Posts: 371
- Joined: Wed May 30, 2018 11:23 pm
- Location: Adelaide
Re: 62 Split Ute
There’s a complete single cab just waiting for you at Edwardstown Cam, just sell that beautiful blue beast and get onto itCam Biscuit wrote:This thing is gorgeous in person, well done Mark & Cooper
Makes me want another splitty!
-
Beatts
- DSKer
- Posts: 371
- Joined: Wed May 30, 2018 11:23 pm
- Location: Adelaide
Re: 62 Split Ute
Put the face back on and ended up using mirror spray paint to rejuvenate the reflective lens on the original tail lights. Worked a treat.
Found a couple of pin holes in an old bay tank I had so soldered them up and then tested the tank with metho. No leaks although the welds look like bird shit. Good thing they’re on the bottom and won’t be seen again.