agree you need a mile to turn the thing around
1956 Bus Project Post Completion
Moderators: warb, Rawdyn, Leroy, byronbus, Tonz Magonz, dmb
-
Kombiiknut
- DSKer
- Posts: 213
- Joined: Thu Oct 06, 2022 7:35 pm
-
Kombiiknut
- DSKer
- Posts: 213
- Joined: Thu Oct 06, 2022 7:35 pm
Re: 1956 Bus Project Post Completion
a pic of the underside as it is all coming together
- Attachments
-
- underside.jpg (184.09 KiB) Viewed 6766 times
-
Kombiiknut
- DSKer
- Posts: 213
- Joined: Thu Oct 06, 2022 7:35 pm
Re: 1956 Bus Project Post Completion
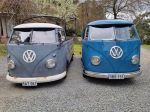
Off to get the radars fitted with some new tyres, we tried a few to get the widest tyre possible that still was able to be taken on and off without heaps of trouble
- Attachments
-
- off for wheels.jpg (197.93 KiB) Viewed 6765 times
-
- off for doors2.jpg (268.38 KiB) Viewed 6765 times
-
- off for doors.jpg (225.69 KiB) Viewed 6765 times
-
Kombiiknut
- DSKer
- Posts: 213
- Joined: Thu Oct 06, 2022 7:35 pm
Re: 1956 Bus Project Post Completion
When mid way through the build we couldn't get new door skins for a bloody long time, which in turn was a pain in the arse as we couldnt fit them prior to painting the bus. Anyway they finally rolled up and after a lot of pain Martin made them fit, painted, and installed.. she was really starting to come together.
- Attachments
-
- doors on2.jpg (155.44 KiB) Viewed 6765 times
-
- doors on.jpg (262.87 KiB) Viewed 6765 times
-
Kombiiknut
- DSKer
- Posts: 213
- Joined: Thu Oct 06, 2022 7:35 pm
Re: 1956 Bus Project Post Completion
Electrical was a pretty easy task with the awesome complete loom purchased from Vintage Wiring, a bloody good product and made to perfection in my opinion. When i got the loom made i opted for them to put wires in for front and rear indicators as i have since installed the Custom Dynamic led clusters after seeing how good they were on Nickos SC. Highly reconmend these lights, they are fucking awesome.
- Attachments
-
- electrical2.jpg (145.92 KiB) Viewed 6765 times
-
- electrical.jpg (69.78 KiB) Viewed 6765 times
-
Kombiiknut
- DSKer
- Posts: 213
- Joined: Thu Oct 06, 2022 7:35 pm
Re: 1956 Bus Project Post Completion
Time for the engine build..Wild.
I had these boxes sitting in my shed for at least five years, resisting the urge to finally build this 2332. Once again i bought everything brand new when the dollar was around 1.10 US.
Was a fun build, firstly clearanced the new case, trial fitted everything a hundred times.
Fair bit of messing around with the stroker 2332 machining barrels to get the right compression etc, but was an awesome build, and is a bloody good strong motor.
Not a huge fan of the A1 exhaust, its just too bloody loud, i am about to cut if open and fill it with some packing to see if i can quieten it down a bit without loosing any real power, will see how that goes.
- Attachments
-
- 6.jpg (37.74 KiB) Viewed 6765 times
-
- 5.jpg (177.54 KiB) Viewed 6765 times
-
- 4.jpg (169.95 KiB) Viewed 6765 times
-
- 3.jpg (167.6 KiB) Viewed 6765 times
-
- 2.jpg (173.8 KiB) Viewed 6765 times
-
- 1.jpg (162.22 KiB) Viewed 6765 times
-
Kombiiknut
- DSKer
- Posts: 213
- Joined: Thu Oct 06, 2022 7:35 pm
Re: 1956 Bus Project Post Completion
Last one for the day.
Motor installed, had to shoehorn its big wide arse in there, but it just fits.
Motor installed, had to shoehorn its big wide arse in there, but it just fits.
- Attachments
-
- engine in.jpg (162.77 KiB) Viewed 6766 times
-
morts
- DSKer
- Posts: 2092
- Joined: Sun Oct 29, 2006 9:22 pm
- Location: McLaren Vale, South Australia
Re: 1956 Bus Project Post Completion
Very, very clean Lachie - definitely worth the wait.
No matter what happens they can't take you out in the street and shoot you......
-
Gunther
- DSKer
- Posts: 383
- Joined: Wed May 06, 2009 9:31 pm
Re: 1956 Bus Project Post Completion
Bloody beautiful
-
Kombiiknut
- DSKer
- Posts: 213
- Joined: Thu Oct 06, 2022 7:35 pm
Re: 1956 Bus Project Post Completion
A few more pics to add.
Time for the interior, a good friend is one of the best trimmers ever, the most patient and sometime frustrating man there is, but perfection in his work is a must. From start to end the kombi was at Tony's for around 2 years.
Yes I helped him with a lot of the work, but i think my lack of patience and just wanting to get the bloody thing done was as much a pain in his arse as the opposite was in mine.
To start we made a rear roof hutch to cover off the hinges and enclose the rear, making the boards, trial fitting, and getting everything right, to then totally remake in other materials using the first example as a template to get it all perfect. Then wrapped in a compression foam (for when you hit your head on it when sleeping in the bus), then wrapped in Porsche alacantara suede.
Used a special poly type material to make up rear corner side sections and also wrapped in the suede, came up a treat.
Also made up new front hoodlining inserts at this point to be later wrapped.
- Attachments
-
- 4.jpg (166.67 KiB) Viewed 6629 times
-
- 3.jpg (137.29 KiB) Viewed 6629 times
-
- 2.jpg (150.78 KiB) Viewed 6629 times
-
- 1.jpg (16.78 KiB) Viewed 6629 times
-
Kombiiknut
- DSKer
- Posts: 213
- Joined: Thu Oct 06, 2022 7:35 pm
Re: 1956 Bus Project Post Completion
Whiped up some front and rear door cards, used the old door pockets from the original cards and re-produced some door card pockets out of fibreglass, also ended up wrapping these in leather (same as seats).
Made up a long side internal trim, and both side door cards ready for wrapping to match seats.
Made up a long side internal trim, and both side door cards ready for wrapping to match seats.
- Attachments
-
- 10.jpg (145.63 KiB) Viewed 6628 times
-
- 7.jpg (85.29 KiB) Viewed 6628 times
-
Kombiiknut
- DSKer
- Posts: 213
- Joined: Thu Oct 06, 2022 7:35 pm
Re: 1956 Bus Project Post Completion
Front carpet all made up with the leather edging, including cover up to the seats and around the sides of the seats.
also made a nice neat little handbrake level boot out of leather.
used a good old school alloy cup and trimmed to side to fit around the base of the steering column to cover that area off.
also made a nice neat little handbrake level boot out of leather.
used a good old school alloy cup and trimmed to side to fit around the base of the steering column to cover that area off.
- Attachments
-
- 8.jpg (72.48 KiB) Viewed 6627 times
-
- 6.jpg (79.9 KiB) Viewed 6627 times
-
Kombiiknut
- DSKer
- Posts: 213
- Joined: Thu Oct 06, 2022 7:35 pm
Re: 1956 Bus Project Post Completion
Dynamatted the living shit out of this thing, doubled the weight of the bus me thinks 
Then insulation on the top.
Then insulation on the top.
- Attachments
-
- 16.jpg (201.21 KiB) Viewed 6626 times
-
- 15.jpg (133.73 KiB) Viewed 6626 times
-
- 14.jpg (207.35 KiB) Viewed 6626 times
-
- 13.jpg (220.58 KiB) Viewed 6626 times
-
- 12.jpg (222.73 KiB) Viewed 6626 times
-
- 11.jpg (11.75 KiB) Viewed 6626 times
-
- 9.jpg (88.81 KiB) Viewed 6626 times
-
- 18.jpg (30.5 KiB) Viewed 6626 times
-
Kombiiknut
- DSKer
- Posts: 213
- Joined: Thu Oct 06, 2022 7:35 pm
Re: 1956 Bus Project Post Completion
The roof lining boards were by far the longest and most difficult job of all, this process took weeks..
We cut and shaped, cut and shaped. Remade, test fitted, and on and on. Each time we would wet the board and lean it against the shed wall with all sorts of weights and things holding them to get the curve right while the we board dried. Then test fit and try again.
For a long time we tried to do this with just one board so that we didnt need the middle joiner piece, in the end we gave up and went with two boards, once again wrapped it all in suede, and then installed.
Threw together a rear seat using the custom kombi kit (highly recomend, the wait to get them is worth it).
Was bloody happy with the result in the end.
- Attachments
-
- 22.jpg (73.77 KiB) Viewed 6623 times
-
- 21.jpg (85.05 KiB) Viewed 6623 times
-
- 19.jpg (111.07 KiB) Viewed 6623 times
-
- 17.jpg (129.5 KiB) Viewed 6623 times
-
- 23.jpg (107.95 KiB) Viewed 6623 times
-
Kombiiknut
- DSKer
- Posts: 213
- Joined: Thu Oct 06, 2022 7:35 pm
Re: 1956 Bus Project Post Completion
And then the day came, the interior was finished.
Tony should be very proud of his work, unfortunately not long after this he had a stroke and pretty well lost the use of one hand, so sadly this will be the last bus interior he will ever do, the guy is a ripper.
(thats Tony in the photo)
Now home to finish a few things and get this bus back on the road.
- Attachments
-
- finishing trim3.jpg (229.85 KiB) Viewed 6621 times
-
- finishing trim2.jpg (134.38 KiB) Viewed 6621 times
-
- finishing trim1.jpg (282.08 KiB) Viewed 6621 times
Last edited by Kombiiknut on Thu Apr 13, 2023 9:04 am, edited 1 time in total.