60 11 window
Moderators: warb, Rawdyn, Leroy, byronbus, Tonz Magonz, dmb
- splitthis
- DSKer
- Posts: 1552
- Joined: Wed Nov 28, 2007 8:47 pm
- Location: Adelaide
Re: 60 11 window
Well progress stopped completely there for a little while. I have been working on the house and extended my garage to make some more space for the bus but I'm back in the garage now. I came home from reVOLKS completely inspired and keen to get back to work, Thanks to Doc, Rob and Andrew for the advice over the weekend, I had heaps of questions and the three of you helped get some things straight in my head before firing up the welder. Progress is slow, but rust is being replaced with clean metal and i'll get there in the end.
After removing the front outriggers and cross section the chassis rails were rusted through and full of dirt.
Passenger side
Drivers side inner
and outer
After removing the front outriggers and cross section the chassis rails were rusted through and full of dirt.
Passenger side
Drivers side inner
and outer
Last edited by splitthis on Mon Nov 04, 2013 9:17 pm, edited 1 time in total.
Chasing any Neiman steering lock parts, will consider anything.
- splitthis
- DSKer
- Posts: 1552
- Joined: Wed Nov 28, 2007 8:47 pm
- Location: Adelaide
Re: 60 11 window
I have a donor chassis section that i'm using for the front cross brace, I-beam sections and chassis patch pieces (thanks Steve). But before i could replace the front cross brace i needed to replace the rear-most piece of the heater tube under the cab. I had a spare section from the donor but it was rusty on the same end as mine. The bends and diameters at each end of the tube are different so i had to get a little creative and use some pie cuts to get it right.
What I started with
Old on new
All finished
Once the heater tube was fixed and in place I could then fit the front cross section (forgot a pic) and the front outrigger with some fabricated top hat. All the new stuff has been blasted on the inside and painted with KBS. Then i grind of the KBS where the plug welds will be using the dremmel and give it a coat of Zinc it just for a little extra protection. Its a bit tedious marking and then grinding the paint off for all the plug welds so I've bought some "spot" stickers and ill try applying them pre-paint and peeling them off after to leave perfect circles of clean metal for welding.
Chasing any Neiman steering lock parts, will consider anything.
- splitthis
- DSKer
- Posts: 1552
- Joined: Wed Nov 28, 2007 8:47 pm
- Location: Adelaide
Re: 60 11 window
When I cut the middle outrigger off the chassis was really pitted, I toyed with the idea of treating it and leaving it but for the 45min to repair it I just cut the section out...... good thing too. Look at all that dirt!
Here is the piece i cut out, you can see how thin it is, well worth the effort.
All patched up
Then came the Outrigger and a section of top-hat.
And with the rear in too and trial fitting the inner sill.
Here is the piece i cut out, you can see how thin it is, well worth the effort.
All patched up
Then came the Outrigger and a section of top-hat.
And with the rear in too and trial fitting the inner sill.
Chasing any Neiman steering lock parts, will consider anything.
-
- DSKer
- Posts: 179
- Joined: Mon Jun 13, 2011 12:14 am
Re: 60 11 window
Nice work there Matt ,
Did u check u didn't melt the loom in the chassis rail when u did that patch?
A previous owner fused all the wires together on mine at the same spot.
Keep going
Did u check u didn't melt the loom in the chassis rail when u did that patch?
A previous owner fused all the wires together on mine at the same spot.
Keep going
-
- DSKer
- Posts: 138
- Joined: Tue Apr 05, 2011 8:33 pm
- Location: Mt Gambier
Re: 60 11 window
looking good grylls, keep it up
- splitthis
- DSKer
- Posts: 1552
- Joined: Wed Nov 28, 2007 8:47 pm
- Location: Adelaide
Re: 60 11 window
woval56 wrote:Nice work there Matt ,
Did u check u didn't melt the loom in the chassis rail when u did that patch?
I nicked it with the grinder but Im replacing the whole loom anyway. The front to back section is probably ok but the rest is trashed.
Chasing any Neiman steering lock parts, will consider anything.
-
- DSKer
- Posts: 914
- Joined: Fri May 17, 2013 1:07 pm
Re: 60 11 window
Looking the goods there matt, nothing like Vw show to get the juices flowing and get u cracking on your own project at home. I see u even found time to go treasure hunting good stuff
- splitthis
- DSKer
- Posts: 1552
- Joined: Wed Nov 28, 2007 8:47 pm
- Location: Adelaide
Re: 60 11 window
Cheers Brad, theres always time for treasure hunting! When you get a lead you need to jump on it ASAP. Last time I waited a few weeks before chasing something up I did 7hr round trip for nothing. Ill put some pics up of what I found once I've picked everything up, nothing spectacular but a couple of good bits.
Chasing any Neiman steering lock parts, will consider anything.
-
- DSKer
- Posts: 138
- Joined: Tue Apr 05, 2011 8:33 pm
- Location: Mt Gambier
Re: 60 11 window
oi grylls where are all the pics :p
- kombi niko
- DSKer
- Posts: 1402
- Joined: Sat Mar 30, 2013 4:28 pm
- Location: Mornington peninsula
- Contact:
Re: 60 11 window
yes!, come on mate I cant be the only pic whore around here
- splitthis
- DSKer
- Posts: 1552
- Joined: Wed Nov 28, 2007 8:47 pm
- Location: Adelaide
Re: 60 11 window
I have been a bit slack lately. I have been doing stuff but some of it was boring and the rest was fixing something I wasn't happy with.
When i got the bus the bulkhead had been hacked out (bet it seemed like a genius idea at the time). I managed to find a replacement but both edges where it joins the B-pillars where rusty, meaning I couldn't replace it complete and I had to butt weld it in. After a solid 3 hours cutting, measuring, cutting, measuring and yeah more cutting I got it in. It had some rust which i planned to fix once it was in as I didn't want to shrink/stretch it before it was fitted. The drivers side weld is really nice and a little bit of a skim and you would never know it was there. The passenger side was a ok but not perfect. The issue was the 70mm of the OG bulkhead was really stretched making it hard to get good alignment and a smooth weld after grinding.
Then in the last couple of weeks I found this.....
Which meant back to this
So thats a fair few hours wasted unfortunately, I'm glad I did it though, it would have bugged me forever if I didn't.
I have almost finished the front chassis cross section. Because I used an OG one cut out of an old bus I removed sections of top-hat and put it in from underneath.
Then once it was installed I welded in the sections of top-hat I took out. Still need to clean up some welds but its in.
Once that was in I could do the front drivers outrigger and top-hat section.
Thanks again to Steve for this chassis section
I've been cutting sections out of this to patch all my holes, it's cool to be able to patch up all the rust with OG metal. You can see all the holes from the floor removal (floors being used for Steves project). I have hammered flat a piece of copper pipe and use that to weld up all the holes.
The last of the outriggers was removed, surprise surprise it had rusted through the chassis. I use a piece of garden hose duct taped to the vacuum cleaner to get all the dirt and crap out of the chassis rail. There was LOTS in there.
Last 2 outriggers and the final top-hat section replaced.
Hopefully this week i can get the new bulkhead trimmed and tacked in.
Last edited by splitthis on Tue Dec 31, 2013 12:35 pm, edited 1 time in total.
Chasing any Neiman steering lock parts, will consider anything.
- kombi niko
- DSKer
- Posts: 1402
- Joined: Sat Mar 30, 2013 4:28 pm
- Location: Mornington peninsula
- Contact:
Re: 60 11 window
AHH the bulkhead panel mine was chopped out!! Whats the story with the other chopped up bus? its looks pretty good?? Wheels on it ok?
- splitthis
- DSKer
- Posts: 1552
- Joined: Wed Nov 28, 2007 8:47 pm
- Location: Adelaide
Re: 60 11 window
Just incase anyone read this and thought it sounded like a good idea...... it isn't. Once the dots have been painted over they are a proper head f#$k to peel off. I ended up removing them with the dremel anyway. It would probably work if you were just using zinc gal but once covered with the KBS they were impossible to peel.splitthis wrote:
Once the heater tube was fixed and in place I could then fit the front cross section (forgot a pic) and the front outrigger with some fabricated top hat. All the new stuff has been blasted on the inside and painted with KBS. Then i grind of the KBS where the plug welds will be using the dremmel and give it a coat of Zinc it just for a little extra protection. Its a bit tedious marking and then grinding the paint off for all the plug welds so I've bought some "spot" stickers and ill try applying them pre-paint and peeling them off after to leave perfect circles of clean metal for welding.
Chasing any Neiman steering lock parts, will consider anything.
- splitthis
- DSKer
- Posts: 1552
- Joined: Wed Nov 28, 2007 8:47 pm
- Location: Adelaide
Re: 60 11 window
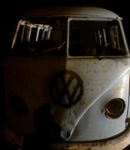
That pic is how we found it! Its been there for 25-30 years. We took everything we could off of it including the good wheels (2 were rotten). The bulkhead was really solid except under the "bulge" it took three trips out there to get everything. Unfortunately there was no power and I couldn't get a genny so it was battery tools only which sucked.kombi niko wrote:AHH the bulkhead panel mine was chopped out!! Whats the story with the other chopped up bus? its looks pretty good?? Wheels on it ok?
Chasing any Neiman steering lock parts, will consider anything.
- splitthis
- DSKer
- Posts: 1552
- Joined: Wed Nov 28, 2007 8:47 pm
- Location: Adelaide
Re: 60 11 window
Been a bit slack with the updates, work has been progressing slowly, should be off to the blasters in the next few weeks.
Started with this
Which lead to this
So cut everything out, rust converted and zinced all the inside.
Then made up a patch which was time consuming but quite fun really
And then all welded in.
Also fixed up the passenger side rear tub.
fabbed patch
Don't have a pic of that welded in but thats all done too. Then I moved onto getting as much rusty metal cut off before it goes to the blasters. Which left the bus a little lighter.
Plenty of rust
I have a new inner and outer valance ready to go, just need to get the bottom of the A-pillars and the valance-pillar connection pieces.
Had to cut out what was left of the engine bay too as that had all been hacked
Chasing any Neiman steering lock parts, will consider anything.